

How To Nail Interior Door Casing
Interior Trim Work Nuts
All the trim basics from showtime to finish, plus a clever way to become those miters tight
![]() Time
Time
Multiple Days
![]() Complication
Complication
Intermediate
![]() Cost
Cost
$101–250
Introduction
We show you how to brand crisp, sharp corners and tight joints when installing door trim, window trim and a three-piece baseboard. With a few bones carpentry tools and a little patience, you can trim out a room in a weekend. And with a little practice you can master the two key trim techniques, mitering and coping.
Tools Required
Materials Required
- 3d cease nails
- 4d finish nails
- 6d finish nails
- 8d cease nails
- Wood putty
- Forest trim
In this article, nosotros'll show you the basic steps for installing a wide trim around a door and window, complete with mitered corners. We'll as well show you how to put in a built-upwardly baseboard made from a combination of three types of moldings.
Yous'll need several key tools to practise a first-class interior trim molding job. Use a ability miter saw for clean bending cuts. A power miter saw vastly simplifies the job because it allows you to brand incredibly accurate cuts in a matter of seconds. Fifty-fifty professionals admit they couldn't practice the same quality of piece of work without ane. If you don't have a power miter saw, yous tin can rent one. If you're renting a miter saw, cut several scrap pieces to get the feel of the tool before cutting your trim.
You lot'll besides need a coping saw. This saw has a narrow blade and tiny teeth that allow you to cutting tight curves; it's available at whatever hardware store. And hither'south a tip: Avoid that annoying trip to the hardware store in the middle of your project—pick upwards a couple of spare blades in case yous pause ane.
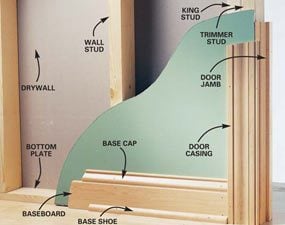
The photo below illustrates the trim carpenter lingo nosotros'll apply in this how-to article.
Video: How to Trim a Door
Travis Larson, senior editor at The Family Handyman, will show you how to trim a door in about 10 minutes per side. The get-go fourth dimension you practice it, information technology will have longer but once you get the hang of it, you'll be trimming out doors like a pro.
Project step-past-pace (23)
Pace one
Get Gear up and Set up to Commencement
- Articulate the room you want to trim out.
- Make your cuts in the eye of the floor.
- Put a fan in the window if dust is a problem.
Prefinishing Interior Trim Molding Saves a Ton of Time
One time you get your trim home, sand and stain or paint the trim before y'all install it. It's a lot easier to finish trim before installation, working on sawhorses, than afterward, lying on the floor with sandpaper and a staining rag. Plus you tin can practice a amend task of sanding and finishing the pieces. Afterward y'all've installed the pieces, be prepared to touch them up a bit. Practise all the stop work in a well-ventilated area.
Step ii
Project 1: Interior Door Molding Case
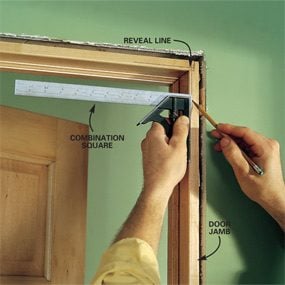
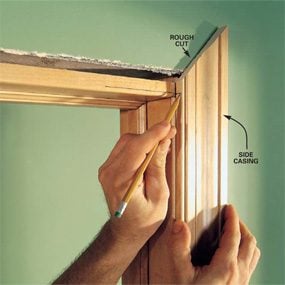
Mark the Reveal
- With a combination square, marker a reveal line iii/sixteen inch from the border of the jamb.
- Pro tip: Use a sharp pencil and position the marks in the corners and about every foot along the jamb edge.
![]()
Footstep 3
Cut Test Pieces
- Cutting ii 12-inch-long test pieces of the casing at opposite 45-caste angles on the power miter box.
- Use the test pieces to cheque the fit of your casing on the door jamb.

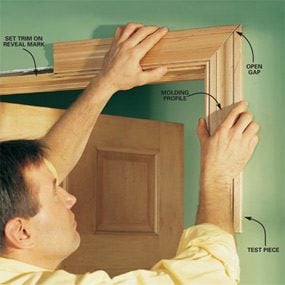
Step 4
Check the Miter
- Hold the test pieces on the reveal marks to cheque the fit of the miter in the corner.
- Note: Even though the corners should be a perfect 90 degrees, ofttimes they're not. In improver, if the jamb sticks out or is set back slightly from the wall, a 45-degree miter cutting won't fit tight. Past holding the test pieces at the corner you can see exactly how your casings will fit.
- If the joint is even slightly open at the top or bottom of the miter, adjust the angle on the miter saw slightly, recut both pieces and cheque the fit again.
- Pro tip: Take your time — you may be surprised how tight yous tin can get the joint to fit.
Step 5
Cut the Side Casing
- Cut the side casing almost 1/2 inch overlong and concur it in place on the door jamb along your reveal marks.
- Utilise a sharp pencil to transfer the top reveal mark from the caput jamb to the side casing.
- Cutting the miter at the angle you established with your test pieces.
Pace six
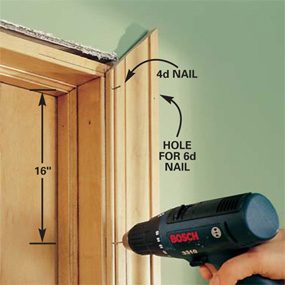
Predrill and Tack
- Hold the side casing in place.
- Predrill smash holes every 12 to 16 inches, using a drill flake nearly 1/32 inch smaller than the nail size.
- Pro tip: Stay 1 inch away from the ends to avoid splitting.
- Drive 4d finishing nails into the jamb and 6d finishing nails into the wall.
- Note: If you're using thicker casing, increment your boom size one increment, using 6d nails in the jamb and 8d nails in the wall. Your nails should penetrate the studs and the jamb at least iii/4 inches.
- Tack the casing into the jamb commencement, then to the wall.
- Pro tip: Wait until you've fit all the casings earlier you drive the nails in completely, in case something doesn't fit right and you accept to remove the trim to recut it.
Step 7
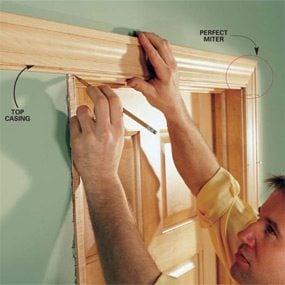
Miter and Mark the Top Casing
- Cut the corresponding angle on the top casing, leaving the opposite side at least one inch overlong.
- Check your miter at the second corner with your test pieces, and adjust if necessary to fit tight.
- Mark the opposite corner on the acme casing, cut it and tack information technology up.
Step 8
Marking the Second Side Casing
- Cut the second side casing about 1 inch overlong.
- Concord the casing astern and parallel to the door jamb.
- Make a mark where the edge of the side casing intersects the upper edge of the tiptop casing.
- Cut the side casing about 1/32 inch overlong.
- Slide the casing into place.
- Cheque your fit, and so trim it to its final length.
- Once the miter fits, blast the casing in place.
- Pro tip: You may have to slip a pocket-sized shim backside 1 of the casings to align them.

Step 9
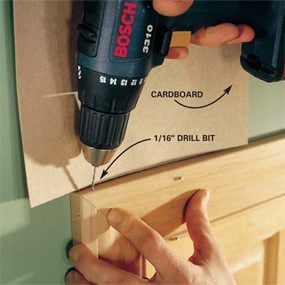
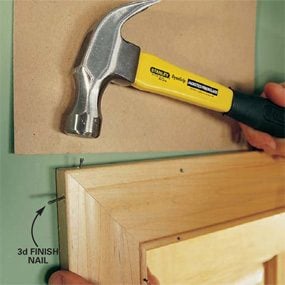
Predrill the Corners
- Marshal the miters and predrill a ane/16-inch hole for 3d finish nails, one from the top and 1 from the side.
- Pro tip: Hold a piece of cardboard against the wall to forestall marring the wall while drilling.
Step 10
Nail the Corners
- Bulldoze the nails into the casing gradually, alternate between the two nails and then the miter doesn't slide out of alignment.
- Pro tip: Utilise cardboard once again between the wall and the hammer to avoid marring the wall.
Step eleven
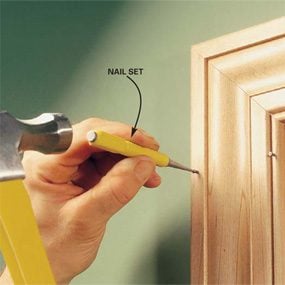
Set the Nails
- Tap the nails simply below the surface with a hammer and a boom set.
Step 12
Project ii: Instance a Window
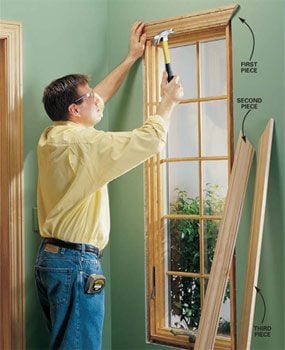
Brainstorm With the Top Casing
- Trim a window using the same techniques every bit we showed for a door. However, cut and tack the top casing beginning. And so fit the sides and finish with the bottom.
Step 13
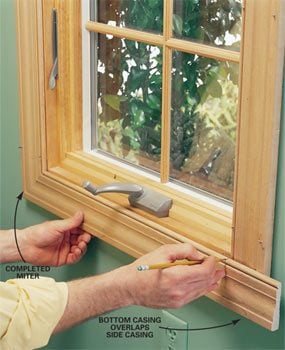
Miter the Bottom Last
- Fit i miter on the bottom, and then overlap the opposite miter and marker it.
- Cut the miter 1/8 inch overlong, slide the casing into place and trim it downwardly gradually while checking the fit.
Step 14
Projection 3: Install Baseboard
Cutting All the Base Extra Long
- Use a stud finder to locate the studs, and marker their location on the wall with a narrow slice of painter's record.
- Rough-cut all the baseboards nearly two inches overlong and lay them in place around the perimeter of the floor.
- Starting with the longest wall, cut the starting time piece to length and smash it into the studs with 6d finishing nails.
- Pro tip: Remember to predrill your holes. You can also put a modest amount of glue at the miters and cross-blast them with 4d finishing nails.
- Go along effectually the room, cut the inside corners off at 90 degrees and butting them together.

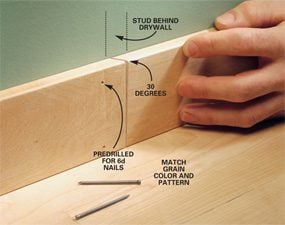
Cutting a Scarf Joint
If you take to splice two pieces on a wall, employ a "scarf joint." Cutting a 30-degree angle on each piece; if the articulation opens slightly, this bending will hide the scissure. Select pieces with like grain color and pattern so the articulation is less visible. Always locate a splice over a wall stud.
Step 15
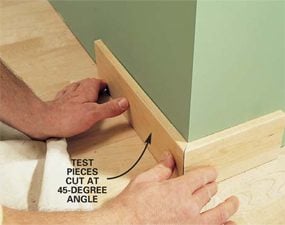
Exam Fit the Miters
- Miter 2 ane-foot test pieces and press them tightly confronting the exterior corners to decide the correct angle.
- Adjust the miter saw to become a tight fit.
Step 16
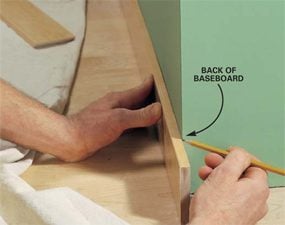
Cutting the Miter to Length
- Hold the baseboard in place and marking the backside at the corner.
- Cut the piece to length at the predetermined angle for an exact fit.
Step 17
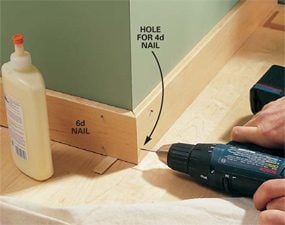
Cut and Nail the Second Slice
- Cut the second piece to length at the same angle.
- Predrill, mucilage and nail the exterior corner.
Corner Fitting Trick
If the drywall tapers in at the bottom of the wall or stops curt of the floor, but drive a spiral at the bottom of the wall and turn it in until the caput of the screw is at the aforementioned plane every bit the main wall. The head will prevent the baseboard from tipping in.
Pace 18
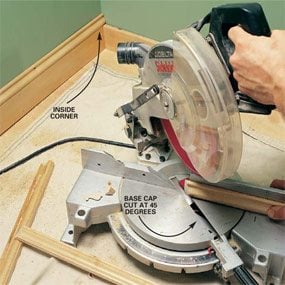
Cope Inside Corners of the Base Cap
- Run the base cap in the same order as the baseboard.
- To cope the within corner of the base cap for a tight fit, kickoff cut ane end at a 45-degree bending equally if you were cutting an inside miter.
Pace 19
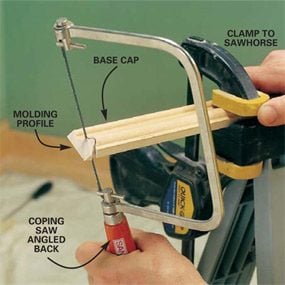
Cut the Profile with a Coping Saw
- Apply a coping saw to cutting along the profile left by the miter.
- Pro tip: Angle your coping saw back slightly (back cut) to get a tighter fit on the face of the contour.
Footstep xx
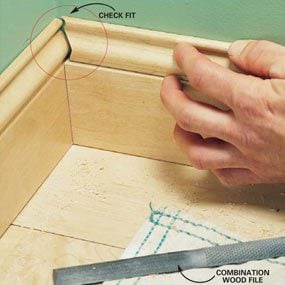
Exam Fit the Cope
- Bank check the fit confronting the bordering base cap in the corner.
Footstep 21
Fine-Tune With a File
- Trim with a file as necessary.
- After plumbing fixtures the cope, measure the cap for length, cut the other end and nail information technology up.

Pace 22
Add the Base Shoe
- Install the base shoe the aforementioned as the base cap, coping inside corners and mitering outside corners.
- Where the shoe meets the door casing trim, cut at a 30-caste bending the portion that sticks out.
- Predrill and nail the base shoe to the baseboard with 4d finishing nails.

Step 23
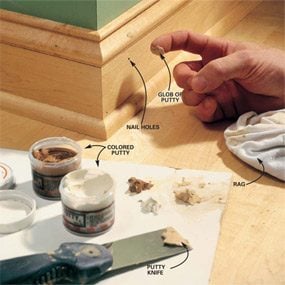
Finish with Filler
- Set the nails and fill the holes with colored putty to match the wood stain.
- If necessary, mix 2 shades of putty together to get a skillful colour match.
- Pro tip: With light-colored wood, always mix the color on the calorie-free side; darker putty stands out.
- Printing the putty into the holes with your finger and wipe the excess off with a cloth.
How to Shop for Interior Trim
Stock interior trim is available in a wide range of styles from most lumberyards and domicile centers. Nosotros chose a relatively wide (3-i/4 inches) beaded wood casing trim to go around our doors and windows. It's 11/sixteen inches thick. We used three components to create the base: a 1/2-inch ten 3-1/4 inch. "hook strip," a 9/16-inch ten one-3/eight inch base cap, and a seven/16-inch 10 iii/iv-inch base shoe (run across "Interior Trim Terms," to a higher place). Combine other standard trim types to create wider and more detailed shapes.
If you don't detect an interior trim molding manner y'all like or you're trying to match a molding in an older house, search"millwork" online. Millwork shops tin can custom-produce about whatever type of interior trim from well-nigh species of wood. Custom work, however, comes at a price; be prepared to pay as much every bit three times the price of stock moldings, plus setup charges. In addition, you may have to wait 4 to eight weeks.
Most interior door molding is made of solid woods or medium-density fiberboard with a forest veneer. Oak, pine, birch, maple and poplar are the most common types available. We chose maple for our project.
Sometimes y'all can find trim made of various types of plastic, most oft prefinished in white, brown or simulated wood. This trim is far more stable than wood but cuts much the aforementioned, if not easier. What it lacks, notwithstanding, is the warmth and varied grain pattern you lot can but find in real woods.
Originally Published: November 26, 2020

How To Nail Interior Door Casing,
Source: https://www.familyhandyman.com/project/interior-trim-work-basics/
Posted by: yorkwoor1936.blogspot.com
0 Response to "How To Nail Interior Door Casing"
Post a Comment